
Basic ornamentation techniques: cuts
What is a cut?
By "cut" I mean a single grace note produced by momentarily sounding a note that is (nearly always) higher than the main note being decorated (or being cut, if you like).
Cuts have a variety of uses, but before looking at these, here's my basic rule of thumb for playing cuts. In both octaves of the whistle's range:
- Use the G finger (3rd finger of your top, normally left, hand) to cut the notes D, E, F# and G.
- Use the B finger (1st finger of your top, normally left, hand) to cut the notes A and B.
You can use other fingers to cut various notes, and there's nothing to stop you from trying other options, and sticking to what sounds best for you. There's a section on this later in the page. I recommend these two mainly for simplicity and because they will work in pretty much every situation and on every whistle.
A C-natural cannot be cut in this way. And it's hard to do much with a C#. We'll worry about these notes later.
Cuts on D through to G
Some examples. Let's take the notes D through to G in the first (lower) octave. We cut these using the G finger.

|
|
Click the icon at left to listen to cuts on D through G (30K) |
I play each note twice, but without tonguing the second note - this is indicated by the "tie" or "slur" mark underneath. The articulation is provided by the cut - in other words the cut separates the two notes. To perform the cut, you lift your G finger for the tiniest fraction of a second. Lift it just enough to uncover the hole and then put it down again. It will take you a while to get the hang of this, because the 3rd finger is quite weak, and you're not used to making this slight movement.
It's a very simple, effortless movement, but people often make it more complicated by imagining that it's difficult! Remember to keep your hands and fingers very relaxed. If you're squeezing the whistle between your thumb and fingers, it will be very hard to do a nice quick and easy cut.
Let's try these in the second octave.

|
|
Click the icon to hear cuts on D through G in the second octave (20K) |
Cuts on A and B
Now for the notes A and B in both octaves. Cut both of these notes by lifting the B finger. We'll try these in both octaves.

|
|
Listen to cuts on A and B, both octaves (20K) |
You may once again find it awkward, because we're using a new finger. But remember to lift your B finger for the tiniest fraction of a second. Since you don't lift it more than a a millimetre or so before putting it back down, you needn't worry about dropping the whistle, so stay very relaxed.
Now here's an exercise to practise all the cuts we've tried so far. I don't think you need a sound clip for this.

Uses of cuts
So much for the mechanics of cuts. Now where can we use them?
1. Using cuts instead of tonguing to separate notes of the same pitch
The exercises give us a clue to one very important use of cuts. We can use them to separate two notes of the same pitch without having to tongue the second note.
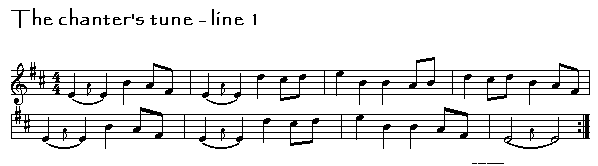
The first line of The chanter's tune has a number of repeated low Es. These are a good place to practise our cuts.
|
|
Listen to line 1, with cuts on low E (50K) |
Remember, use your G finger to cut the note of E. And for our current purpose, don't tongue the second note, but allow the cut to separate the two quarter note Es. This means you have to time the cut to fall exactly on the second beat.
2. Using cuts and tonguing at the same time for extra emphasis
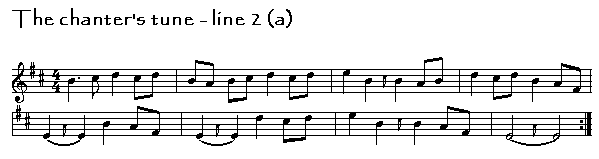
For a different effect (a "crunchier" sound) we can tongue as we cut. Here's the second line of The chanter's tune:
|
|
Listen to line 2, with cuts on low E, plus "tongued cuts" on B. (50K) |
In this second part, I am cutting and tonguing at the same time in a couple of places. Look at bar 3, and at bar 7. There are two quarter-note Bs. I have cut these and tongued at the same time (using my B finger, of course).
3. Using cuts simply to draw attention to important notes
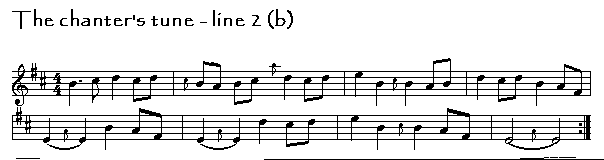
Let's add a couple of refinements to this second part of The chanter's tune.
|
|
Listen to line 2, with more cuts on B. (50K) |
I have added two more cuts, both tongued: on the eighth-note B at the start of bar 2, and one on the quarter note high D on the third beat of the same bar.
These cuts are different in that they do not separate notes of the same pitch. Their purpose is to decorate, or draw attention, to notes that we feel are important for the phrasing of the tune. Mostly, at least in dance tunes, cuts of this type will fall on a strong beat. The tongued cut on the B gives a nice crunchy sound and makes the on-beat stand out.
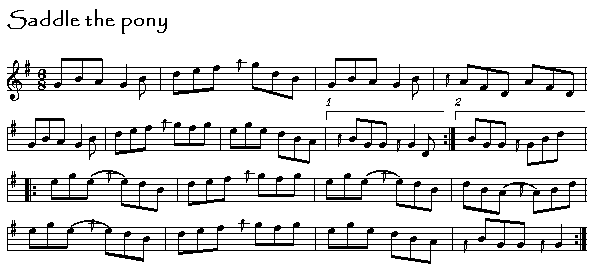
Here's a final example, the jig Saddle the pony. If you're pretty much a beginner, don't spend too much time on this tune before studying the section on jigs (Jigs: trickier than you think): there are some important things you should know about the rhythm of jigs before attempting a tune like this one. I give it here to illustrate the various uses of cuts.
|
|
Saddle the pony, without repeats (85K) |
I have stuck quite a few cuts into this tune, though not an unusual amount by any means. Most of them are simply there to emphasize notes that I consider important to the phrasing.
However, in the second part, I use slurred cuts to separate two high Es (in bars 1, 3 and 5) and two As (in bar 4). I could have tongued here, but I have just tongued the two previous notes, and I like the slinky feeling of slurring and cutting here.
3. Using cuts when the same note occurs three times in succession
In bar 8 of both the first and second parts, you'll see another handy use of cuts: when the same note is repeated three times, instead of tonguing three times, tongue once or twice and then use a cut for the third note. This is not only easier on the tongue, it sounds less monotonous.
4. Cuts as a component of rolls
Another important use of cuts is in playing the ornaments known as rolls... But don't worry about them just yet. Get used to playing cuts whenever you want before you even think about trying to play rolls. And also get used to playing taps.
Alternative fingerings
As I mentioned above, you don't have to stick to the fingerings I have shown you. The advantage of using the G and B fingers is that you can practise using two fingers only, and they will work in just about every situation and on every whistle.
Some fine teachers recommend using the finger immediately above the last - e.g., use the your 5th finger ("E finger") to cut D, your 4th of "F#" finger to cut E, and so on. I don't generally do this, but very often I use the B finger to cut all the notes in the first octave. Try cutting a G in the first octave, using the G finger, and then using the B finger. You'll probably find that the B finger gives you a much crisper sound, which I like. However, this won't work so well in the second octave. Trying to cut the high D with the B finger will not work - you'll get another high D. And cutting the high E with the B finger will produce similar results, or a slight variation in pitch, not a nice crisp cut.
On louder whistles, including many "high-end" makers' whistles, using the B finger to cut the higher notes such as high G and A may cause the whistle to squawk. I suggest you master using the G finger in both octaves for everything up to and including G, and the B finger for A and B. Then experiment with your own whistle(s) and see what suits you.
What do we do with Cs?
The decorating of Cs (both C-natural and C#) in general calls for a little ingenuity, and I'll discuss options other than cuts in later sections.
Playing a sort of cut on a C-natural is not too difficult, provided that
you are playing the C using cross-fingering rather than by half-holing.
I recommend using the full (two-handed) cross-fingering pattern for C-natural [|oxx-xox]
wherever the speed of the tune and the particular passage allows you to
do so. (And your whistle: some of the newer, louder whistles available are
designed to give a true C-natural using only the top hand, and sound horribly
flat if you use the two-handed fingering.)
If you're using the two-handed fingering, simply tap the second finger of
your bottom hand onto its hole to sound a momentary high D. If you're using
the top hand cross-fingering only [|oxx-ooo], you'll need to tap all three
fingers of your bottom hand simultaneously.
To get a similar effect on a C#, you could, I suppose, slap down your bottom five fingers momentarily to cut the C# with a high D. Now, a five-fingered cut sounds a trifle excessive but, as you will realize if you have studied the topic Not lifting a finger, you could play the C# with all the fingers of your bottom hand down, meaning that you'd only have to use the 2nd and 3rd fingers of your top hand to sound a momentary high d.
While both these options will work, I cut C-naturals only rarely, and C# virtually never. (There's only one tune in my repertoire where I feel the C# is crying out for a bit of extra welly, and that's a northern polka-type thing anyway.) The effect of cutting Cs is much weaker than on all the other notes, and I don't mind letting these notes sound different.
More uses of cuts
As I mentioned earlier, cuts are an essential component of "the ornaments known as rolls" and I've written a whopping big topic on these last-mentioned little animals. But you can also use cuts in one or two other tricks described in these pages.
- you'll need cuts to perform the "no-tonguing" exercise I describe in the topic on Tonguing
- cuts are used to form what we can call "false triplets", discussed on the page on triplets.
- you can combine them with rolls: see the not-yet-written topic on Combining ornaments.
Versatile little beasties!
Next page: Slides, or glissando
Previous page page: Taps
Site contents: Back to the home page
Updated: 27 Oct 2000 (formatting 14 October 2004)